TGMC:Transport Officer

|
This page is a part of the TGMC wiki.
TGMC is a project based on the CM-SS13 codebase. |
| MARINE | |
 Transport Officer |
Access: Tadpole Dropship Piloting, Pilot Gear and CIC Difficulty: Hard Rank: Warrant Officer (Starting), Chief Warrant Officer (25hrs), Ensign (50hrs), Lieutenant Junior Grade (100hrs) Class: Navy Supervisors: Captain, Field Commander, Staff Officer Duties: Fly the Tadpole, ferrying marines, supplies and mission critical objective items across the AO. Get hit with direct Boiler globs, Warlock gravity crushes, or get your Tadpole computer disabled by a stealthy Hunter because NO ONE CLOSED THE BLOODY CADES. Guides: None Quote:"We're in the pipe, five-by-five." |
Introduction
As a Transport Officer, your chief role is to fly the Tadpole Dropship. The Tadpole is an important dropship that marines use as a rally point, offload supplies onto, and potentially acts as evacuation when things go FUBAR. Technically, you’re also meant to take command if no other ranking officer is present -- but it isn’t expected of you. It should be noted, evaccing early with half the marines -- and moreover, without announcing it -- will ruin the operation, and you will be blamed.
Chin up, it only gets worse from here.
Communication
As part of command, you have access to all of the marine frequencies. Make sure you inform marines over general radio when the Tadpole is departing, and where the Tadpole is landing. You’ll often be talking to Requisitions for supplies (e.g. metal and plasteel), or an ASRS pad/fultons to sell xenos.
You also have access to Send Orders, which'll make a very noticeable announcement to all active marines, even if they're deep in caves. If you find yourself in trouble, or need to inform marines where you're landing, try to use this over using the normal radio frequencies.
Picking a Dropship
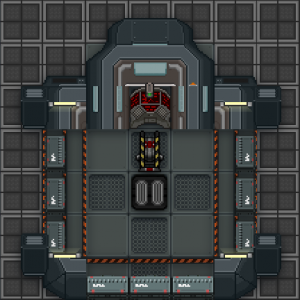
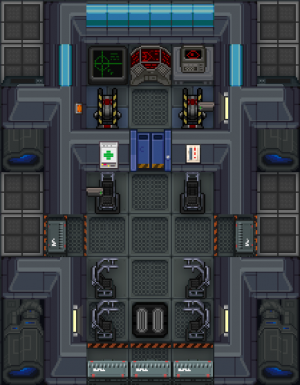
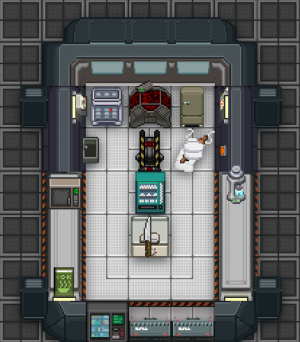
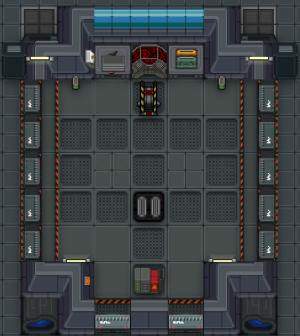
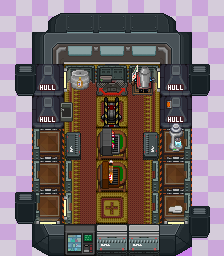
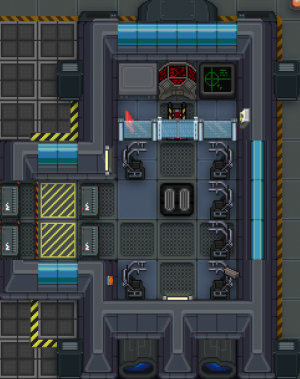
At the start of a round, you can choose one of several options using the dropship picker terminal, which will be located next to the Tadpole landing spot in the Hangar. You can only make a single selection, and this selection cannot be changed once the Tadpole is deployed. All variants of the Tadpole are equipped with a Flight Surgeon Medical Equipment Dispenser (stocked with basic medical supplies, autoinjectors and reagent bottles) and at minimum one fire extinguisher.
Tadpole Variants
Preparing the dropship
Once you’ve picked a model, you’ll be expected to fly it. Keep in mind that
- You cannot launch until at least 12:18
- Launching early will prevent the FOB drone from being deployed.
Make sure to consult with everyone before departing- deploying before the FOB is constructed will cause marines to be angry at you! This doesn’t mean you should be sitting around though…
Default radio commands:
- .v for Command
- .u for Requisitions
- .m for Medical
- .s for Fire Support
- .e for Engineering
- .q for ALPHA SQUAD
- .b for BRAVO SQUAD
- .c for CHARLIE SQUAD
- .d for DELTA SQUAD
- , for General radio
Initial Preparations
First of all the plasteel cades on most models are often unwired. This means xenoes can slash at them without taking any damage! You start off with barbed wire in your construction pouch, so use it on the plasteel barricades to wire them and help deter any nasties that might consider slashing at them. You might also want to link any plasteel barricades using a crowbar, which allows all the barricades to open and close simultaneously. This comes at the risk of leaving you more open to xenoes charging straight in and overwhelming you, should anyone leave the barricades open however.
You cannot build barricades, razorwire or anchor plasteel barricades on the Tadpole. Deployable barricades can still be used, and you can technically drag a plasteel cade onto the Tadpole (which a xeno can simply push or pull away, but sshhh!).
Installing Equipment
Installing equipment on the weapon attach-points (on the front of the tadpole), and the interior attach-point (located inside, obviously) is vital to boosting the effectiveness of the Tadpole. Both these slots take dedicated equipment, and can be installed using a Powerloader, two are usually found inside the hangar. To install equipment :
- Pick up the module using an empty claw on help intent (harm intent will attack the module itself). If you picked up the wrong module, you can drop it by clicking on an empty tile.
- Click on the attachpoint while directly adjacent to it (weapon attach points can be somewhat finicky as they're small. If you're having trouble clicking on it, try alt clicking the tile and directly clicking on the attachpoint in the status bar).
- To uninstall the module, simply use an empty claw on the module itself (not the equipment i.e. the sentry/HSG/surgery table. Again if you're having trouble clicking on it, try alt clicking the tile and directly clicking on the module in the status bar)
The hangar will often have some equipment lying around for you to choose, but in case they get lost/destroyed, you can print more using the dropship fabricator or order some from requsitions. Keep in mind that the Pilot Officer also needs to use the dropship fabricator, and often demands a monopoly on it. Don’t waste points mindlessly on equipment you don’t need. You can deploy equipment on weapon attachpoints using the Navigation Computer.
Also note that there tends to be a lot of electronic modules around the hangar e.g. spotlights. These cannot be installed on any current Tadpole variant, only on the Alamo's electronic attachpoints (and due to their very limited use as most LZ's are already lit up, rarely installed)
A list of equipment is as follows. (This can also be installed on the Alamo attachpoints, but as it's often parked on either the ship or the FOB, equipment is rarely installed on it).
Dropship Equipment
Stocking the Tadpole
Finally you'll need to consider what to actually stock on the Tadpole. As a minimum, you'll be expected to take a supply beacon from req so that the Tadpole can act as a resupply point and fufill req orders. Taking a fulton pack is optional, but also recommended as people with often drag corpses to the Tadpole, expecting them to be sold. If the RO is not present to give you any of these, you may need to hack the requistions vendor to get your gear.
While it's not mandatory, you should pack ammo boxes (which can be vended from the requsitions vendor), M-22 welding kits (from the surplus uniform vendors), cable coil from You-Tool vendors, and medical supplies such as splints, gauze ect. as the nanomed mini only comes stocked with the bare minimum. Food is also something essential to pack as well (you can vend protein belts from the surplus uniform vendors). Try to avoid throwing marines ammo boxes off the Tadpole, it's considered bad form, even if you have your own ammo boxes with you.
Marines may occasionaly use the Mortar or Howtizer on the Tadpole. While you aren't obligated to make space for them, just keep in mind that setting either up might be useful, should any marines want to spot for you.
Flying the Dropship
You can pilot the dropship using the navigation computer and other than you, only the Captain, Field Commander, Synthetic and Squad Leaders (including acting Squad Leaders) can launch the dropship.
Once you hit launch, after a little while you’ll be in low orbit (you’ll notice the scenery change around you). Click on the navigation computer again to enter the landing interface.
Landing the Tadpole
The Tadpole can land in any unobstructed, open-air position (i.e. not caves). When using the landing interface, accessible by using the central console in low-orbit, you will see a birds-eye view of the battlefield, and an outline of the Tadpole in the center of the screen. If the entire outline is green, you have a viable landing area; if any tiles are red, they are obstructed, and the Tadpole cannot land in that position. You can rotate the landing outline using the rotate button at the top of your HUD (smaller side is your nose). Once a landing field has been selected, the outline will turn blue, indicating that the Tadpole will arrive there shortly.
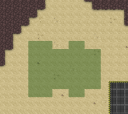 Fully green landing indicator. You're clear to land.
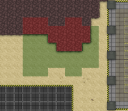 Partially red landing indicator. The landing zone is obstructed.
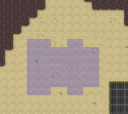 Blue landing indicator. The landing zone has been selected.
If you’re having trouble seeing where you are, toggle Night Vision mode (the option is in the window that appears when clicking the navigation computer). While in Night Vision mode all turfs are revealed, but you cannot see their contents or any marines/xenoes. Once you’ve decided where to land, turn off Night Vision and check to see whether the area you’re landing is under attack, has barricades or supplies. Anything underneath the Tadpole when it lands will be crushed, in the case of organics, gibbed.
Xenoes frequently wall off areas, so don't be afraid to ask marines to clear walls for you to land. You may have to repeatedly ask over radio, or use orders before Marines actually start to clear walls. Marines can also clear metal or reinforced walls for you, via using C4, detpacks, Plasma cutters, or a whole load of bullets (preferably fired out their guns).
Places not to land
- On top of the FOB barricades
- On top of ammo and supplies in the FOB
- On top of machine gun emplacements/sentries
- Directly in front of a whole load of xenoes
- In the wide open where you can be attacked from all sides and gassed
As a reminder, disable nightvision mode to check if the area is hot, or if you’re landing on anything important.
The best position for the Tadpole is just behind the front lines or near the objective- where it can provide support with a HSG, but isn't the main focus of xenoes. Landing right on the front line themselves might block other marines- or more likely get yourself swarmed by multiple xenoes. The Tadpole can also be used to fortify a miner position, which will help bring req a steady stream of points. The choice is ultimately up to you, depending on what the Tadpole is loaded with.
Defending the Tadpole
There’s a wide range of threats to your Tadpole and if it falls, so do the chances of the ops success. Defending your Tadpole’s navigation computer is of upmost importance. Any xenomorph can destroy the tadpoles navigation computer after a delay, and once the computer is destroyed, the Tadpole will permanently disabled and will not be able to fly. There is no way to repair the Tadpole once it’s disabled in this manner. Do not let the navigation computer be destroyed at any cost.
If the situation is desperate, every Tadpole variant has a inner and outer door button. Pressing this will shut the blast doors, protecting you from threats… or keeping any threats inside and unable to escape. These blast doors are not invulnerable, and can be melted with acid or destroyed with a crusher charge, but they are immune to conventional slashing. Remember though, deploying these blast doors only delay the inevitable. You will probably need to leave, ASAP if marines do not bail you out.
When req has spare points, you can also consider buying a standard ST-571 sentry. This will better help defend against threats compared to the forward facing turrets mounted on the weapon attach-points, especially if you plan on leaving the Tadpole unattended. Either set them to radial and plonk them in the center of the Tadpole, or if you have the luxury of buying several- one in each direction.
Don’t try to be clever and launch with multiple xenos onboard. They can break the computer mid flight and land back on the planet safely. Don’t try to be very clever and launch xenomorphs back to the marine mother ship. Onboard xenoes are an absolute menace to deal with and will distract ship personnel and force marines to stay onboard instead of deploying. If you have no option but to abandon the Tadpole, do it.
More importantly close the barricades behind you when you leave the Tadpole to prevent threats from boarding and, INFORM THOSE FUCKWIT, CRAYON EATING MARINES THAT THEIR MOTHER WILL DIE IN THEIR SLEEP IF THEY DON'T CLOSE CADES BEHIND THEM, AND IF THEIR MOTHER IS ALREADY DEAD, THAT YOU'RE PERSONALLY GOING TO FLY OVER AND PISS ON THEIR MOTHER'S GRAVE, polietly but firmly remind marines to close the barricades behind them as well.
As for more specific threats :
Xenomorph Threats
Sentinels,Spitters,Drones,Praetorians


These castes have acid, which can melt through your barricades and windows. They’re fragile enough to be deterred by gunfire, but consider packing a shotgun loaded with buckshot or slugs (or other weapons with either knockback or stagger) to stagger them and prevent them successfully vomiting acid on your Tadpole. They shouldn’t be able to do too much damage, but having a sentry can help drive them off.
Be vigilant for stealthed Hunters trying to board. Consider taking a tactical sensor, as it can detect their movement to help you spot them. Primordial Hunters can also use Disguise to pretend to be an ordinary object (and they can still move while disguised). If you see messages in your chatlog along the lines of “M40 FLDP begins to slash delicately at the computer”- start shooting and ask questions later. Ideally around where the computer is.
Warriors can very easily fish you out of the Tadpole using Grapple Toss or Fling, which can be extremely dangerous if there are other xenoes around to help finish you off. A shotgun can help deter them, but keep an eye out, especically if you're launching/evaccing.
More of a nuisance than a danger- but if they come with other xenoes they can quickly turn a bad situation worse. They can throw huggers and while the huggers themselves can easily be killed, if you're attempting to shuffle through multiple unaware marines to shoot or melee a hugger, they can potentially trigger before you kill them. Staying alert and aware is your best defence (and hoping your other marines are too as well), and as carriers are somewhat fragile it doesn't take too much firepower for them to go away.
Just another nuisance, yet capable of amplifying the threat of other xenoes. They are capable of banishing your blast doors to let themselves- or other xenoes inside. A Wraith can also make portals- not on the Tadpole itself luckily- but near it. While it shouldn’t present too much danger (unless they start using huggers), you can dispel a portal by throwing an explosive through or at it. Fortunately their damage is average, and they’re relatively fragile, so you can just shoot them to make them go away.
The threat they pose depends on three things : The type of Tadpole you have, if it’s Primordial, and if you’re wearing Mimir. A Tadpole with windows and closed off departments? Minimal threat, until your windows break. No closed off departments? A serious threat if you don’t have Mimir. Closing your blast doors is a last ditch option, but you can either consider moving so the boiler has to reposition, or try asking for someone to counter snipe the boiler.
Keep in mind that tangle rounds and anti gas grenades can purge gas. Use them sparingly though, they’re a little pricey to order from req.
If you're wearing Mimir, the gas shouldn't do you any harm. The bigger threat is that the gas is opaque- allowing xenoes to sneak up and attack everyone inside. Keep your ears open for the sounds of slashing, and don't be afraid to spam bullets into the gas cloud to try and deter xenoes. Be especially wary if you saw any acid castes prowling around before the gas cloud gets emitted, there's no overt tell on your blast doors being melted. If a Defiler is winding up in line of sight of you- inflicting stagger will stop them, and will even stop them while they’re emitting gas.
As before, tangle rounds and anti gas grenades can purge gas. If you’re getting overwhelmed by gas, consider throwing one.
Shrikes have an ability called Unrelenting Force, allowing them to fling everyone out of the Tadpole. They also have a Primordial ability called Psy Vortex, that will knock you around a bit. It's not too much a threat, but can absolutely buy time for other xenoes to attack the Tadpole. If in doubt, close your blast doors and launch.
Behemoths are very capable of boarding your Tadpole, erecting several Earth Pillars, then detonating them all- stunning you and dealing a non significant amount of damage in a AOE range. If you have your blast doors you can try trapping them, otherwise consider leaving.
If you see a Behemoth roar- close your blast doors immediately, launch and endure any complaints about leaving marines behind. They’ve just activated Primal, and are about to ruin your day with multiple falling AOE exploding rocks, a massive AOE shockwave, and if you have any open cades- stampeding over everyone multiple times. If you have no blast doors or cades- you are already dead.
A threat that can be hard to deal with, especially if your landing spot is more open. Making razor wire with metal, then deploying it can be used to stop the Crusher should one be able to charge at you, but the razowire must be at full health to stun the crusher. Alternatively you can try to use the blast doors button when the Crusher comes charging, then closing them quickly to trap them. In both instances, you’ll need other marines around to help secure the kill. Crushers love attempting to crush the interior/weapon attach-point, so if they do have a lane to charge at it you may want to consider repositioning the Tadpole to avoid the loss of any equipment. They also have Crest Toss, which can potentially launch you out of the Tadpole.
In the upper range band of “Oh shit, I’m in danger”, the Queen has acid, spit, and a lovely stunning screech. Pre-emptive use of the HOLD order can mitigate the duration of the stun, and provide a minor defence and pain resistance boost. Other than that, just shoot it and hope they leave. Some cocky Queens like to try to board the Tadpole- you can try to trap it using the blast doors, and hope that everyone inside can kill it before they kill you.
These bastards like to waltz up to your Tadpole and use Petrify, which will freeze you solid. While you’re helpless they’ll either melt barricades, or line up a Shattering Roar to knock you down while other xenoes start attacking you. There is a defence against this- staggering them. Using a shotgun at close range (or any other weapon capable of inflicting stagger) will prevent them from using their ability, and hopefully buy you enough time for help to come. Kings also occasionally like to use Psychic Summon near (or god forbid on) the Tadpole to overwhelm it. Make sure to call out the summon, if you have no other marines to help, lower your blast doors and launch. Primoridial Kings can use Zero Form Beam, which pierces through walls, on top of doing a lot of damage. If there's a lot of marines/dense objects on the Tadpole it can be hard to get out of the way, and it may be necessary to launch if help doesn't come in time.
Your bane. The Warlock has two great abilities to make your life miserable – Grav crush and Psychic blast, and one to make your attempts at killing them difficult, Psychic Shield. If the Warlock has line of sight of ANY of your Tadpole tiles, they can use Psychic Crush to create a damaging AOE that will most likely hit you and everyone inside. Alternatively they can use Psychic Blast/Lance to damage you directly. Mindless bullet spam will be reflected at you using Psychic Shield, and trying to chase it down can also be punished with Psychic shield (not to mention leaving your Tadpole alone or getting ambushed by other xenoes). Pray no one gets the bright idea to fire a rocket at the Warlock with your Tadpole nearby.
Your deterrents aren't great. One is other marines keeping the Warlock away, or the humble X ray rifle with a tac sensor, which can penetrate the Warlock’s shield and allows you to shoot at it safely from behind cover (or more likely, through marines). Similarly the Railgun (no not the CAS one, the handheld one) can also penetrate the shield, penetrate walls and cause Stagger, knocking them out of the Shield or stopping any windup attacks like Psychic Blast or Crush.
If you're close to being critted, you may just need to issue a Hold Order and launch before the Warlock can finish you off
Marine Threats
Grenades
"beep beep". One second later, there’s a live grenade in the centre of the Tadpole. It’s alright, there’s plenty of reasons. Maybe they got shuffled when they threw the grenade, perhaps a Shrike or Warlock bounced the grenade back, or maybe they can’t aim for shit WHY DO WE HIRE THESE ASSHOLES. When you hear a grenade prime, just keep a lookout for any exclamation marks, and be prepared to pick up the grenade and throw it out of the Tadpole. Mark the marine for retribution later and rip his guts out in private
Close Air Support
Sometimes CAS will misfire directly over the Tadpole. If they’ve fired a railgun or minirocket at you, you won’t be able to launch the Tad in time. Just evade the incoming damage, and prepare to repair the cades as quickly as possible. Bombs and missiles however can be avoided, but you need to launch as soon as possible (The Tadpole takes 5 seconds to launch, and most bombs take about 10-12 seconds to land). Just remember, you are under no obligation to sit there and take it.
Tadpole Hugging
The marines are being beaten! The only safe place happens to be your Tadpole! They retreat there, and the medics attempt to revive their dead- only to paint a massive target on your back. Everyone being in one spot invites Warlocks, Behemoths, Boilers and Defilers to use their attacks on you. Amidst the gas that claims the non Mimir marines, the unavoidable Grav crush because everyone is piled on and not shooting the Warlock- and in your confused and dazed state even the Queen and King are starting to pile on the Tadpole. There aren’t many ways to directly avoid this situation- if marines haven’t fortified the outer perimeter, xenoes are going to come bearing down on you, and there’s only so much you can do to fight them off. Especially if those fluoride guzzling fuckwits are too busy complaining or healing, and not SHOOTING.
Recognise the dire situation, and call for an evac. Use Orders to make a nice big announcement, use the HOLD order to reduce incoming damage and keep marines in the fight, yell again over the radio that you’re evaccing, point any any marines outside the cades to get in, then leave. If your barricades are breached- you may need to cut your losses, engage the blast doors and leave. If you’ve lost your blast doors- Good luck.
People will get left behind. People will ignore the announcements. There isn’t much you can do but take it on your chin.
What you should absolutely NOT do is evac unannounced, taking half the marines with you. Leaving half the marines on the ground dramatically increases the chance of them dying, as they need to take on the full xenomorph threat with only half the forces. Even worse, don't hang about in the landing interface trying to choose the perfect spot when you get yelled at to rescue the marines you left behind. The longer you wait to land, the worse the odds are for the marines down there- and the more likely you'll get swarmed down there when you land and cause a full wipe. Land back as quickly as possible, yell at everyone to get on, then launch.
Tadpole Kidnapping
Any, aSL, SL, FCDR or Synthetic can launch the Tadpole. Remember that the Tadpole is yours, and you have authority over it for better and for worse. At the very least, try not to be so far away from the Tadpole that you can’t yell at anyone trying to take it.
Unintentional Full Evacs
On Nuclear War if there are less than 5 marines on the ground, xenoes can force call the Alamo. Occasionally upon finishing a disk, every marine will pile onto the Tadpole- especially if they're under attack. If you launch while everyone is on the Tadpole, xenomorphs will be able to hijack Alamo. You have two options- yell at those lazy shmucks to walk inform everyone that they need to move to the next objective on foot, or if the situation is dire and they cannot- call an evac.
Orders
All Command staff and assigned Squad Leaders have access to Orders which can be used to buff nearby troops. Using one causes you to shout out a unique phrase over the radio. After giving an Order, there is a one-minute cooldown period until you can give another one, but cooldowns for Orders and Markers are separate.
Order effects are influenced by your Leadership skill, which increases both the effect and range.
| Order | Description |
|---|---|

Move order |
Increases movement speed by 0.1 per Leadership level
Great for retreats and getting to objectives quickly |

Hold order |
Reduces damage received by 5% per Leadership level
Increases pain resistance, reduces the effects of dizziness and jitteriness |

Focus order |
Increases accuracy by 10% plus 5% per Leadership level
Makes Aiming instant |

Rally marker |
Places a directional pointer and a map icon, urging marines to Rally at a given point. |

Attack marker |
Places a directional pointer and a map icon, urging marines to Attack a given point. |

Defend marker |
Places a directional pointer and a map icon, urging marines to Defend a given point. |

Retreat marker |
Places a directional pointer and a map icon, urging marines to Retreat from a given point. |
Tips and Tricks
- The importance of Mimir cannot be understated if you have no windows. You WILL be gassed. You WILL take damage. You will NOT be excused for launching early and leaving marines behind just because you nearly died to gas.
- The NK Haul Tadpole is limited choice of dropship, as its large size makes it hard to land without marine assistance, and it's very hard to defend.
- Sentries deployed on the weapon points have easily exploited blindspots. If you notice a xeno exploiting this, you can retract the sentries using the navigation computer.
- Marines frequently do not read radio. They also miss announcements and orders. If you've repeated yourself at least twice over radio, and given at least one order- don't feel guilty about abandoning those marines if you're evaccing. You tried after all.
- Most of the time, the Tadpole is going to end up cluttered. If you have trouble trying to find a specific thing, type Point-To in the command bar (default key TAB), then use the dropdown menu to locate the item you want. Once you press ok, a green arrow should appear over the tile the item you were looking for. SHIFT + click or ALT + click to sift through the contents and pick up whatever you needed to find.
| TGMC Roles 
| ||
| TerraGov Marines | Command | Captain, Field Commander, Staff Officer, Pilot Officer, Transport Officer, Mech Pilot |
| Vehicle Crew | Assault Crewman, Transport Crewman | |
| Engineering and Supply | Chief Ship Engineer, Requisitions Officer, Ship Technician | |
| Medical | Chief Medical Officer, Medical Doctor, Researcher | |
| Marines | Squad Leader, Squad Smartgunner, Squad Engineer, Squad Corpsman, Squad Marine | |
| Civilians | Corporate Liaison | |
| Silicon | Combat robots, Synthetic, AI | |
| Xenomorphs | Tier 0 | Larva, Minions |
| Tier 1 | Drone, Runner, Defender, Sentinel | |
| Tier 2 | Hivelord, Carrier, Hunter, Wraith, Bull, Warrior, Puppeteer, Spitter | |
| Tier 3 | Gorger, Defiler, Widow, Ravager, Warlock, Behemoth, Crusher, Praetorian, Boiler | |
| Tier 4 | Shrike, Queen, King, Hivemind | |
| Others | Zombie, Emergency Response Teams, Sons of Mars, | |
