TGMC:Marine Quickstart Guide

|
This page is a part of the TGMC wiki.
TGMC is a project based on the CM-SS13 codebase. |
You've decided to become the hero the Corps need. Good choice! As with any server, it's important you get yourself familiar with the Rules first. While our rules are pretty lenient, that doesn't mean your actions won't have consequences. Excessive stealing or friendly fire will still get you punished.
Your TODO list:
- Gear up
- Keep yourself and your allies alive
- Destroy the Xenomorph hive
Character Creation
In the menu, the top most button allows you to set up your character. It also allows you to set game settings and stuff.
- Name your character
- Set your job preferences. Set Squad Marine as "High". Other roles are harder and in general require more responsibility.
- Check your keybinds in the Keybindings tab, and feel free to change them to what you are most comfortable with
- Press "Ready" in the main menu
- If the round has already started, press "Join Game" and select Squad Marine.
Note that settings menu is accessible in-game from Preferences -> Game Preferences.
- Go to game settings, and set FPS to 60 or higher
- ensure you have both aimmode and unique action binded.
Waking up from Cryosleep
After finishing character creation you should find yourself in cryosleep.
| Your Squad Leader says: "WAKE THE FUCK UP, PRIVATE! WE HAVE A HIVE WITH XENOMORPHS TO BURN!" |
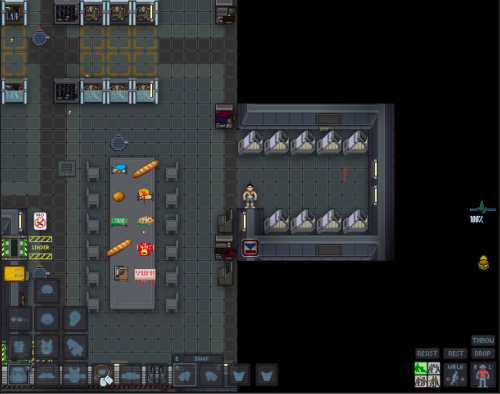
Oh, so you're finally awake? You will be almost naked, hungry and most likely confused, but worry not, the engineers counted on that when designing the ship.
Squad
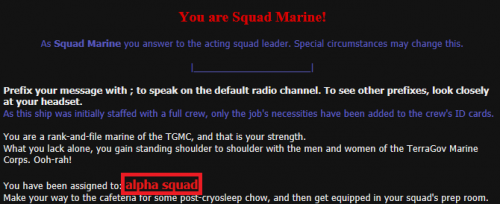
Take a look at the chat panel to your right, your squad assignment along with the flavor text should be there. This is your squad assignment, role, and who your direct superior is in the chain-of-command. Unless you picked a preferred squad in your preferences, you will be assigned randomly. Worry not if you didn't get into the squad you wanted, you will be doing as much shooting as any other rifleman. The only difference is in who is your Squad Leader.
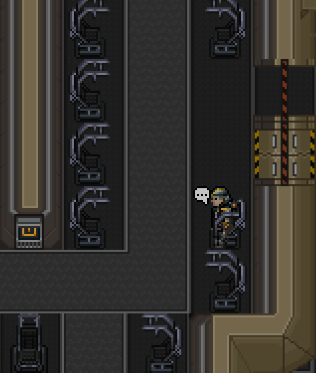
As you can see, there are four colored lines to guide you. In this example, we've been assigned to Delta squad. That means we follow the blue line down. Your squad color is indicated by the squad name's text in the squad assignment message:
- Red for Alpha squad
- Yellow for Bravo squad
- Purple for Charlie squad
- Blue for Delta squad.
After you wake up, either followed your colored line (depends on the map) or just exit the spawning area, following other marines. Stop by one of the food vendors ![]() , click on it and dispense your preferred dish (we suggest one, that's usually enough. Maybe pick one more for later). Pick it up by clicking on it, then click on yourself to take a bite. It might take several of these to fill you up, you've been in cryosleep for a good while. A good rule of thumb is that one prepared meal will add one "level" of food - and so will one protein bar, so don't accidentally overeat.
, click on it and dispense your preferred dish (we suggest one, that's usually enough. Maybe pick one more for later). Pick it up by clicking on it, then click on yourself to take a bite. It might take several of these to fill you up, you've been in cryosleep for a good while. A good rule of thumb is that one prepared meal will add one "level" of food - and so will one protein bar, so don't accidentally overeat.
Your hunger is indicated by this little icon to your right: ![]()
It has four stages in total: orange for starving, yellow for hungry, green for full, and gray for having over-eaten. The starving and hungry states will slow you down, as well as overeating. Keep it in the green! When you wake up, you only need one protein bar or one meal.
Checking the full map
Since we have multiple ships with different layouts, you may find yourself lost or confused. Worry not!
Found in the top right corner of the game's window,
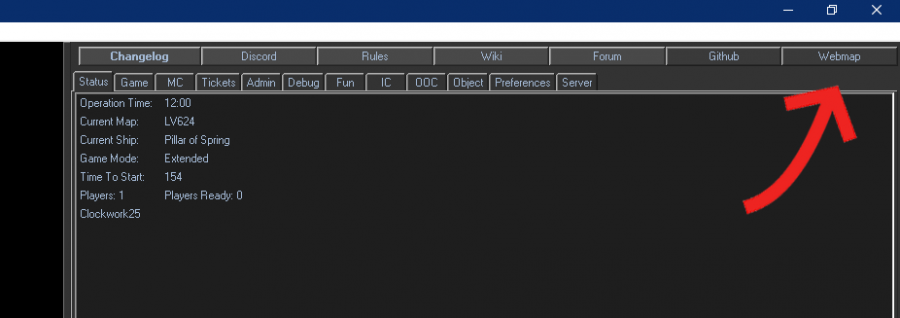
the Webmap button once pressed will present you with the chance to have an interactive map of either the ship or the planetside. A window will open up in your browser, where you'll be able to zoom in/out and move the map of your choice. Note - it might not be available for fresh maps. Ask your comrades for directions.
Gearing up
Quick and easy way
It is possible to IMPORT a loadout from other player. All you have to do is to find a string with the loadout name. It is in the form
ckey//Class//Name
Example:
revolver_man//Squad Marine//nyonn
You can obtain it in Discord, or via OOC. Just ask people to share their pew pew build, and somebody will tell you.
Then you have to import it in the Loadout Vendor.
Getting your Uniform and Armor
Video guide: link, slightly out-of-date
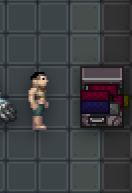
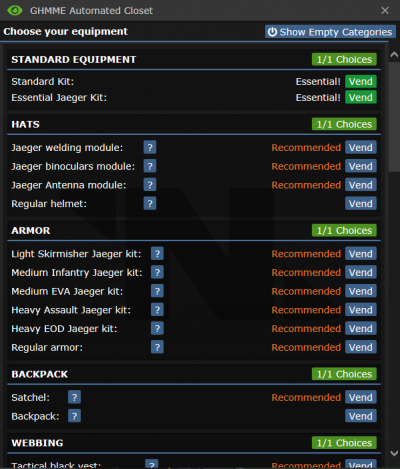
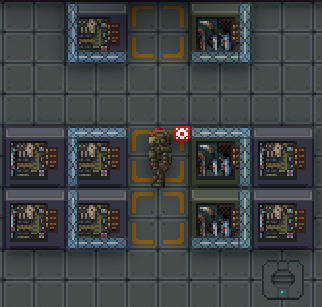
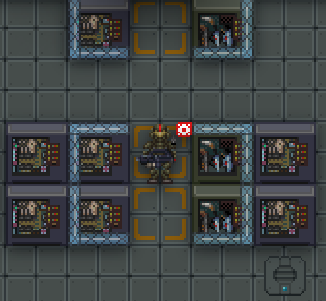
After you had your chow, head into the preparations room, which should be nearby. There are also separate rooms for other squad roles, such as Smartgunner, but you don't have access there. Search for and use the GHMME Automated Closet
 The GHMME Automated Closet will dispense your standard issue uniform, armor, belts, pouches, accessories and masks, and weapon attachments. Check the picture below for outline. Make your choices from the list - items marked with a white "Essential" are vital tools for your job. Your uniform has to be on before you put your armor on, and the webbing attaches onto your uniform. Your webbing, armor, and helmet all have their own small storage slots, and you can store things like weapons on your suit storage (beside your feet slot) or on your back slot. The knife can go in your boot, and the attachments obviously go on your weapon, so just put them in your satchel or on the ground for now. You reading this, baldie?
For a squad marine, a good choice would be:
- Standard. (Uniform, Gloves, Boots, Headpiece, food, facepaint)
- Light/Medium/Heavy Xenonauten Armor. (Helmet which you can put on your empty head, and armor. You can paint them using Facepaint on them.) Take Heavy plates - much more armor, and speed is ok. Helmet armor will always be equal to heavy armor, regardless if you pick Light or Medium.
- Satchel. You start with one anyways. Its a little smaller than Backpack, but later takes time to take items from.
- Tactical black vest. This goes to your undersuit (bottom left) and has several slots to hold items, such as magazines. Click on it with empty hand to access menu.
- Standard ammo belt. This belt is your best friend, because it holds a lot of magazines! If you have a weapon in hand, and press E, that's where you pick your magazines from.
- Firstaid pouch. This pouch can hold medicine, and comes with some as well! Red pills if you're hit, yellow if you're spit, white if you're not sure. Gray if you hate red text about pain. Do NOT take more than one of each pill at a time!
- Flare pouch. There you can hold flares, and it comes full. It also comes with a flare gun, which you can right click the pouch to load. Easy to fill - drag flare pack (in utility section of Weapon Closet) on it.
- General Purpose Storage Module. Put it on the exoskeleton, has 2 slots. (can hold 2 BOXES of ammo)
- Mark 1 Tyr extra armor set. Increases your armor even more, at the cost of slowdown. It comes with a helmet and armor module; to attach them to their respective pieces, hold the armor in one hand and the module in the other, and click the armor with the module to attach it.
- Tactical gas mask. Protects you from nasty Xenomorph chemicals. Be sure to wear it!
More on the Jaeger Armor
Video Guide for Mk1: linkCurrently, Jaeger is split into two categories: Mk 1 and Mk 2. Mk2 is very similar to the Xenonauten gear, and does not require assembly. This is the type of Jaeger you will receive at the GHHME vendor; you just have to attach the storage and armor modules to it.
However, if you head to a Surplus Armor Vendor ![]() , you can find the Jaeger XM-02 Combat Exoskeleton inside, alongside the other Mk 1 parts. You want to make sure your exoskeleton has them attached!
, you can find the Jaeger XM-02 Combat Exoskeleton inside, alongside the other Mk 1 parts. You want to make sure your exoskeleton has them attached!
To assemble an exoskeleton, hold the exoskeleton in one hand and the part you want to attach in the other, then click on the exoskeleton with said part. There are currently 6 different parts you can attach to an exoskeleton:
- Chestpiece. This is the most important part of your exoskeleton, as it is the only armor piece that varies in armor, besides certain Armor Modules.
- Armpiece and Legpiece. Both of these add armor to your exoskeleton, so you definitely want to add them. However, all of the armpieces and legpieces have the same armor stats; so go wild with your options!
- Helmets. The bucket you put on your head. All helmets have the same armor, so yet again go wild with what looks good to you.
- Storage Modules. Most of these modules are specialized to what they say on the tin; injectors for injectors, medical for meds, etc.
- Armor Modules. This is where it gets interesting. Helmets and armor sets can have different modules. For example, a welding module on your head and a Baldur module on your suit. Each of the modules increases the armors capacity in some different way from each other. Tyr gives you more armor, Mimir makes you immune to taking damage from most gas clouds as well as less acid damage; and there is a good bit more of them. Click the ? to find out what each module does.
You can also color each individual armor piece (chestpiece, armpiece, legpiece and helmets) with Green Facepaint that either comes from the GHMME or in the General tab in the Surplus Armor Vendor. Hold the piece in your hand and click on it with the facepaint to color it. You can also right click helmets to change the colors of the visors, too.
Pouches and Storage
After finally setting your armor up, you'll still have the rest of the automated closet to go through. For specialist roles, the choices here are a bit more important, because what they carry has a large impact on what they can do to support their team. As a squad marine, though, you should mostly be concerned with how many bullets you can carry, and how long you can keep yourself in the fight.
There's uniform storage options under the webbing entry - the webbing vests have more storage for smaller items, but the tactical webbing can hold larger items like magazines, except the larger magazines for LMGs. You can also put a holster here, but unlike the belt holsters it only holds the gun. Click on your uniform with one of these in hand to strap it on.
Belts are probably the most important option under this section, because they can easily provide about half your storage, but unlike the backpack slot they're more limited in what they can carry. Pistol belts can carry a pistol and six spare pistol magazines, the utility belt can carry any three normal or smaller items, and the ammo belt can hold six standard magazines, but, like the webbing, can't hold things like LMG drums.
A popular choice for pouches is the first aid pouch, which contains 8 of each pill (red for brute, yellow for burn, purple for pain, white for anything and green for toxin), five splints and an emergency autoinjector to stab save unconscious marines . Flares are another good option, for lighting up areas from a distance, and you can't go wrong with more magazine storage. Make your two choices here. Remember, you can get more pouches from the surplus vendor, but they generally won't be pre-stocked like the ones from this personal closet. (The tool pouch will always be stocked.)
You can also choose between a backpack and a satchel here. A satchel has 15 "blocks" of storage (tiny takes 1, small takes 2, normal takes 3), while a backpack has 24, but a backpack also has a second-long delay to pull anything out if it's on your back.
Don't worry too much about your attachment choices, the weapons vendors have an infinite supply of all of them.
All of the gas masks serve the same function; but you can use the coifed ones if you want to hold in your hair. Marines getting cold in the icy planets is a thing of the past!
Getting your Weapon
NOTE: all weaponry is balanced to be 'viable', with difference coming in the form of playstyle each requires, such as shotguns CQC or marksman rifles range.
Experiment and try different builds, aim to have fun and enjoy the game!
You will never be a dead weight for your team, unless you're shooting them instead of the enemy. AIM!
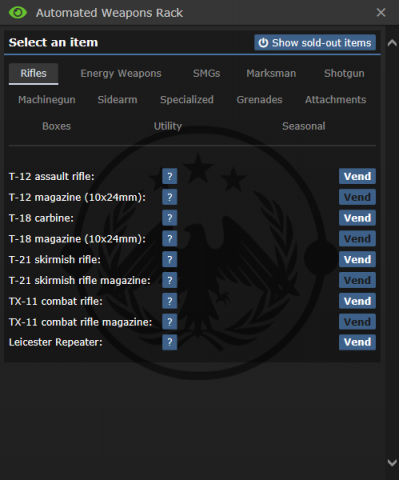
Across from your uniform vendor, inside your cubicle, there should be a Automated Weapons Rack  . There's quite a large variety of weapons.
Here's an example of one of them.
- Step 3
- Pick one up with your other hand, then click on your rifle to load it. Your T-12 will be empty, so you must load it.
- Step 4
- Click the toggle firemode button in the top-left of your screen to switch the rifle firing mode to what you want, either automatic burst fire or automatic.
- Step 5
- Click the target button in the top-left start AIMING. It will allow you to shoot past allies without getting spanked for friendly fire. When you press it, wielding your weapon in both hands will also make your character to start aiming.
- Step 6
- After that, equip your rifle with E or click on your suit storage slot. Put the rest of your magazines into your ammo belt, pouch, satchel, or webbing, until they're full.

- Step 7
- Lastly, find two 10x24mm ammo boxes in Boxes section. Put them inside your armor or backpack. To refill a magazine, take a magazine in one hand, box in the other, and use box on magazine. Magazine holds 250 bullets, equivalent to 5 magazines.
Getting your Attachments
Now is the time for adding attachments onto your gun.
To check what attachments your weapon can support, inspect it (Shift+click on the item) and the click on the link in 'The codex has relevant information' to open the codex and see the full list of attachments available, as well as any stats for your weapon. Codex is most useful source of information. Some weapons come with attachments that cannot be removed, such as the stock on the AR-12.
Attaching something is the same as reloading your rifle: Rifle in one hand, attachment in the other, click the rifle with the attachment. Attachments can also be examined like a weapon to see what effects they'll have. Maybe counter-intuitively, lower scatter is better. Scatter refers to where your bullets go, accuracy refers to whether they hit anything they pass over, most others should be self-explanatory.
Good choice for AR-12 is:
- Extended barrel (accuracy)
- Magnetic harness (brings your weapon back to your suit storage if it is dropped)
- Angled grip (faster wielding)
Getting other Gears
After you're done, you might also want to grab a flare gun few flare packs and put them into your satchel. Flares serve an important role, giving you intel and may prevent you from walking into an ambush. Always flare a room first before pushing into it with your squad. Flashlights work forever, but they're much less space efficient and can be disabled with a single slash.
You may notice a requisitions area, which is where you can get more advanced gear such as Tyr Mk2 or SWAT masks. Since your basic setup is complete for now, you can ignore this area. They won't have anything at roundstart anyway.Loadout
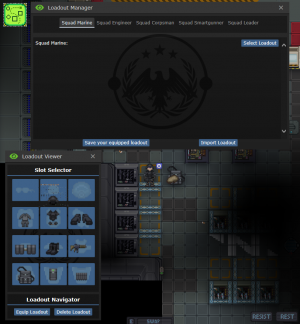
After getting your equipment the way you want it, head over to a loadout vendor (black one, check out the picture) and save your current equipment. On subsequent rounds, you can go straight to here and instantly equip everything at the same time. On the bottom right you have the option to import a loadout.
This won't work for things that don't come from the vendors, though, they just won't be vended at all.
What else?
Check out Marine Equipment for info on other weapons and stuff.
This is your basic kit for this operation, and now we're going to switch to something very important, your Screen Interface and Heads-up-Display.
Screen Interface and HUD
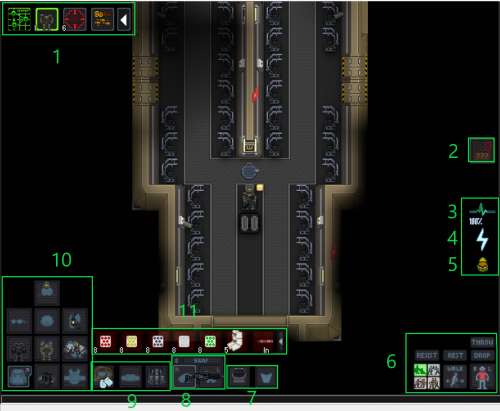
The image to the right shows the Marine game screen. The HUD icons are highlighted and explained below. Note that many of these icons are the same as standard SS13, but there are also many important differences.
- Gear Buttons - These buttons across the top of the screen are some of your equipment's functions. All armor suits have a light that can be toggled by clicking this armor button. Certain weapon attachments like grenade launchers and scopes will create a button here, as well as the fire-rate button where you can cycle through the different firing modes of your currently held weapon.
- Ammo Counter - Each weapon you wield will show an ammo counter icon here, allowing you to keep track of your remaining rounds.
- Vital Signs - Changes as you receive damage.
- Stamina - Changes as your stamina goes down. It can be drained by running and intaking some Xenomorph chemicals, or increased through some chems like Oxycodone or Synaptizine.
- Hunger - Your hunger indicator, orange, yellow, no icon, or gray to indicate your different stages of hunger.
- Body, Action, and Intent Buttons:
- Throw, Drop Buttons - Function the same as SS13. Default hotkeys are 'R' for throw, 'delete' for drop, and 'B' for resist.
- Body-part Target Selection - Can target specific areas, either for medical purposes or shooting purposes (Aiming at a limb does nothing when shooting a Xeno.)
- Intent State Buttons - Help (green/1), disarm (blue/2) grab (yellow/3), and harm(red/4) function the same as they do in standard SS13. Also remember that the default hotkey for grabbing is 'ctrl' + clicking on your target.
- Run/Walk Toggle - Toggles the running or walking state.
- Resist Button - An important button useful to resist being grabbed, pulled, and cocooned in a xeno nest. You can resist many effects, so don't forget to see what works. Also remember to use this when you're on fire! Press to stop, drop, and roll to extinguish the fire and repeat until the fire goes out.
- Pockets - When wearing a uniform, these slots are your right and left pockets. Pouches also go here, as you can see the flare and first-aid pouches attached in the screenshot.
- Right/Left Hand Selection - Selects your active hand. When you grab something, you can press this button (or press the default hotkey 'X') to switch to your free hand, useful for equipping a weapon, activating objects, etc.. while dragging or carrying something. Note that wielding a firearm will take both hands, and if you're holding something in your off-hand when you wield a weapon, it will be dropped on the ground.
- Back, Belt, and ID Slots - These slots function the same as standard SS13. Note that you can put several different types of weapons on your back slot.
- Body Inventory Slots - These slots function the same as standard SS13. Your gear goes in each respective slot. The bottom-left backpack icon will open and close these buttons, and the bottom-right slot is your suit storage slot.
- Storage Space - Your currently opened storage, whether it be your backpack, medical pouch or belt.
Marine Status Icons
Status icons are the small icons floating by the heads of the characters in the game screen. They can represent many different things, and as a Squad Marine, there are many that you won't see until you take on different roles. The most important ones covered here are the rank icons and the health/status icons like stunned, dead, and the different defibrillation states.
Rank Icons
Squad Ranks*
![]() Squad Leader
Squad Leader
![]() Squad Smartgunner
Squad Smartgunner
![]() Squad Corpsman (Medic)
Squad Corpsman (Medic)
![]() Squad Engineer
Squad Engineer
![]() Squad Marine
Squad Marine
*Note - These icons will be the colors of their respective squads
Command and Ship Personnel Ranks
![]() Captain
Captain
![]() Field Commander
Field Commander
![]() Staff Officer
Staff Officer
![]() Pilot Officer
Pilot Officer
![]() Chief Ship Engineer
Chief Ship Engineer
![]() Chief Medical Officer
Chief Medical Officer
![]() Requisitions Officer
Requisitions Officer
![]() Synthetic
Synthetic
![]() Corporate Liaison
Corporate Liaison
Health/Status Icons
![]() Stagger, Stunned, Knocked Down
Stagger, Stunned, Knocked Down
![]() Knocked out/Unconscious
Knocked out/Unconscious
![]() Dead!
Dead!
After a Marine is dead, they will show three different defibrillation states, yellow, orange, or red:
![]()
![]()
![]() These represent how long a marine has been dead, and a decaying timer before they can no longer be revived.
These represent how long a marine has been dead, and a decaying timer before they can no longer be revived.
Heading to Planetside
After this, you are almost ready to rumble! Feel free to talk to your fellow marines, maybe they can help you out as well. You will want to make your way to the hangar, which now that you have a headset can be found on the minimap on the top of your screen, or with the webmap tool.
There will a beige dropship, the Alamo. Its a ship-planet equivalent of a train, which follows a fixed schedule. It can only land in one of two Landing Zones (LZ). Board the ship, find a seat and buckle in. The Alamo can launch at 12:18, but usually launches around 12:20 when a SL or FC deems it time to go. The flight shouldn't take long, you may use this time to talk with your squad and other marines. Press T and use ; to talk on your squad channel and :h or .h to talk on the general channel that everyone has access to.
What the hell is going on?
Depending on Gamemode, you'll have different objectives. Read this, and you'll understand better what's going on. Remember - as a marine, you have responsibilities at ALL times:
- Don't shoot the friendslies! Use aim.
- Follow the SL (Squad Leader, blue arrow points at him) and his orders. "Going silo" - go to silo with others. "Fall back!" - fall back, and quickly! "Do not leave the FOB" - DO NOT LEAVE THE FOB, YOU ADHD VICTIM! Usually, not following orders leads to lose, death and insults in OOC chat with calculations of average marine IQ. Remember this. And note that orders of FC (Field Commander) are over orders of SL.
- Do not get behind. If you're walking alone - you are already dead. If you're on the edge of the squad - you will be the first to be killed and dragged away. If you're running last - you're slowing down the squad, and slow squad is a dead squad. Even in heaviest armor, press Alt to run. If you see that you're considerably slower than an average marine, then there is a problem with your food, or pain (eat your pills), or in fractures which a corpsman can temporarily fix with a splint.
- Read the chat, check the map. Will help you with stuff above. Protip: you can use Key Bindings and assign a hotkey to minimap, such as 0.
- Cover key specialists. If you see that an engineer repairs an APC on a nuke, or a Corpsman drags a corpse from a swarm of xenos - cover them, and you'll be more useful than most of the marines!
- Survive. Not as important as other tasks, because if you follow points above you should be well defended. But still, try to make sure Corpsman doesn't wate his time on your cold, stupid corpse.
Battle, or TIME TO UNGA
In general, fighting through the ground is a slow process of fighting off angry xenomorphs, carving through resin walls with knives to destroy their killing lanes, and pushing through to their critical hivemind-stabilizing silos. Keep looking at your automap (open and close by clicking the green button on the top left), and make sure you aren't wandering too far off from the main group of marines. Squad leaders (squad-colored L in person, squad-colored star on the map) and the Field Commander (white-on-blue star in person, yellow target on the map) have trackers that point them to the final objective, and can buff you by shouting orders if you stay near them, so follow their lead.
When there's an enemy nearby or you hear shots or other signs of potential hostile activity, take your rifle out of your armor slot by either clicking on the sprite or pressing E. When you want to shoot, always make sure to wield it by hitting Z with it in your active hand, then click somewhere to shoot. Never fire a rifle-sized weapon one-handed as it causes a lot of recoil; you can tell when the screen shakes a lot. Always stay near your allies so that they may help you out when you get in a pinch.
If your rifle is out of ammo and you have an ammo belt full of fresh magazine:
- Step 1
- press Z to unwield your rifle since you need an empty hand to get your new magazine (You may skip to step 2, since you will unwield automatically if you change hands)
- Step 2
- press X to change the active hand from your rifle hand to your empty hand
- Step 3
- press E to instantly get your new magazine from your ammo belt
- Step 4
- click the sprite of your rifle with the magazine on your hand
- Step 5
- press X to change the active hand from your empty hand to your rifle hand
- Step 6
- press Z to wield your rifle.
Or, if your gun is capable of it, you can perform a Tactical Reload.
- Step 1
- Open storage that has a magazine in it, whether it be a belt or backpack.
- Step 2
- Click and drag the magazine to your gun sprite, and it will reload it for you.

|
Generic FC says: "Whew! That was fun reloading your gun under heavy fire!" |
Pushing Forward
When you're on the offensive, you should be more focused on cohesion and not walking into dangerous areas. In general, it's best for every Marine to be packed together fairly closely, but not so closely that nobody can fire or chase down kills. Don't get left behind and don't push ahead too far on your own, even if the area seems safe. If the area ahead is full of resin walls with thin passages through them, don't try to push through it; clear it out with machetes, flamethrowers, the Pilot Officer's fire support, an Engineer's plasma cutter, or a lot of bullets. The same goes for purple sticky resin on the floor, because walking over it will make you incredibly slow and thus vulnerable. Also look out for tiny resin holes at the center of floor tiles, usually hidden behind fallen items; walking over one will trip you for a long time and release a facehugger to attack you!
Falling Back
When you're on the defensive, either around a forward position (likely near a mineral miner) or the landing zone itself, you need to balance staying safe behind the barricades and pushing out with other marines to finish off xenomorphs. Don't leave the barricade wall alone, or you'll likely be flung, shoved, and dragged away from the rest of the force. Keep in mind that, generally, your team will lose if you keep trying to hold without pushing out again, but you aren't really in a position to change that, yet, so the most you can do is try to make critical plays with grenades or other high-damage weapons to give everyone an opportunity to get moving again. If things start getting rough, be on the lookout for a squad leader or officer calling for evacuation, and make sure you're on the Alamo when it leaves for the last time. After it lands in the hangar, get off, fast; the xenomorph hive leader will psychically call the dropship back down once the engines are cooled off again, They will then choose to either try to attack the main ship by hijacking the dropship, or simply capture the dropship and end the round. If they hijack, follow a high-ranking job's lead, because there isn't too much of a protocol to go off of otherwise.
Moving properly
It is very important to move in one line with your fellow marines and fire in a way where you won't hit your squadmates. It is better to miss a shot than to hit a friendly marine. Medics are a rarity. Always let the people in the front shoot, don't try and move through them. Staying on grab intent ![]() (the yellow intent, hit 3 to use it) during a firefight is vital, otherwise if you walk into someone who is also shooting with help intent
(the yellow intent, hit 3 to use it) during a firefight is vital, otherwise if you walk into someone who is also shooting with help intent ![]() , meaning that both of you are in help intent, you will swap positions and get hit. If you do need to shoot through marines, and you aren't the Smartgunner, make sure you're in aim mode!
, meaning that both of you are in help intent, you will swap positions and get hit. If you do need to shoot through marines, and you aren't the Smartgunner, make sure you're in aim mode!
Never, NEVER push medics or engineers who have circle above their head. If you push them, you'll stop their current action and your stupid life. If it is a defibrilation or turret placement, you will never be forgiven. Be perceptive on what are your squadmates are doing.
Aim Mode
Ever wanted to shoot through your friends? Through the miracle of aiming ![]() you can fire through your fellow marines with reckless abandon! Albeit with a little slower move speed and fire rate. Note that not all weapons can be aimed. AIMING IS A GOD'S BLESSING! USE IT!
you can fire through your fellow marines with reckless abandon! Albeit with a little slower move speed and fire rate. Note that not all weapons can be aimed. AIMING IS A GOD'S BLESSING! USE IT!
And note that moving decreases accuracy. Different weapons have different penalties - pistols are easier to handle on-move than machineguns. But almost every weapon suffers from this. If you want to be more accurate, stay put.
Stamina
You may have noticed that you have been walking this time.
If you hold down Alt, you will begin to run. If you press 5, you change your movement intent, meaning that you don't need to hold down Alt while running.
Running makes you move faster at the expense of some stamina and melee accuracy (but you shouldn't be in melee as a standard Marine anyway). Some attacks also do stamina damage, and if it reaches a sufficiently low level you get knocked over. Your current stamina can be seen by this lightning bolt ![]() . When it is emptied, it will look like this
. When it is emptied, it will look like this ![]() and shortly becoming a lightning bolt that is darker blue, with a 100% text, indicating your fatigue. Taking further stamina damage will turn the lightning bolt orange and then red when completely empty. You will have to wait to recover from fatigue before your stamina portion starts regenerating.
and shortly becoming a lightning bolt that is darker blue, with a 100% text, indicating your fatigue. Taking further stamina damage will turn the lightning bolt orange and then red when completely empty. You will have to wait to recover from fatigue before your stamina portion starts regenerating.
Neurotoxin will drain your stamina and start killing you once it hits 0, so find a medic if it starts dropping on its own!
Light
You may have noticed there's a button in the upper left of your screen. Click it to turn your armor light on. It is vital to keep the light on at all times, so you can see the environment and marines can see you. It is easy to get spooked by a marine in the dark and accidents may happen.
Keep in mind that every time your armor gets taken off, either by you or by a medic reviving you, the light is turned off and has to be turned back on manually. This also happens when you die, or get attacked by a facehugger.
Overcoming obstacles
If there's a wooden barricade, use your knife to destroy it. If it's a plasteel one, click on it with an empty hand to flip it open, walk through and flip it closed. It is vital that you always close the barricade after you move through it to prevent enemies from easily passing it.
If you see a table or a window frame, you can either jump (bind it!) at the cost of some stamina, or drag your character's sprite onto the obstacle or ctrl+click on the obstacle with an empty hand. This should allow you to climb through after a short animation.
You may also flip a table over by clickdragging it a certain direction, turning it into a piece of cover. This doesn't always work though, such as with wide or reinforced tables, and doesn't compare to a good metal or sandbag 'cade, but it's useful in a pinch.
Healing
There are 4 types of damage in the game: Brute, Burn, Toxin and Oxyloss. Usually you are hit (Brute) or acid spitted (Burn). To heal Burn, use Bicaridine. For Burn, use Kelotane. Tricordrazine heals both, and even toxins. Dylovene heals and purges toxins, such as Neurotoxin. When you're in pain, you move slowly - this is solved by Tramadol. You can eat different pills at once. A general guideline is not to eat more than one pill at a time if you don't have much knowledge of the Medical system. If you take more than two pills in a short time frame, you will overdose (OD) and take various damaging side effects, depending on the chem.
During fight, you can also get other injuries - like a broken arm. In this case weapon or other objects will fall from that hand. To fix this, use a splint. Note that your corpsman can do this faster and better, and you should always seek the Corpsman before trying to do it yourself. If you have other problems, use HF2 Health Analyzer, but even better to ask your squad Corpsman. In worst case, he'll medevac you directly to ship med.
Also, you can use sleep action (IC -> Sleep) to regenerate, and heal cloneloss at a slow pace, which can be sped up with a bed and bed sheets.
Getting face-hugged
Larval hugger can jump onto your face and violate it, leaving a larva inside you. Gross. To avoid this, shoot the small guys before they jump. Don't forget to aim!
- Larva hatches in 5 minutes. If it happens, you also die, possibly without a chance to be revived.
- If you are infected, run to a friendly and stay still until he removes the hugger, saving you.
- Don't forget to cover him. Take your weapon out.
- Or jump into fire, hugger will jump off.
- If somebody else has a hugger on their face;
- Make sure there are no more huggers around.
- With an empty hand and the help intent selected, click them.
- You have very limited time, so if the victim moves just shrug and forget.
- Make sure the poor fella is evac'd if he is infected.
Question?
If you are lost or have a question, feel free to use the MentorPM under the admins tab in the top right to ask experienced players a question. They'll be happy to help! Alternatively you can also use OOC or LOOC chats to ask about something, although you should keep in mind to not give away information about the current ongoing round. You can be banned for this.
What to try next?
If you want to try a different marine role you can try the Smartgunner for extra firepower, or you could alternatively try out a non-combat shipside role like the Ship Technician.
Other Activities
If you're having trouble adjusting to or enjoying frontline combat, and want to contribute to your team in some other way without taking on the responsibilities of a specialized job, there's still a few options for you:
Mineral Miners
These drills all over the map, marked with pink and silver icons, are capable of generating points for the marine side. With a welder, wrench, and wirecutters, anyone can fix them, even if Squad Engineers are the best at it. As a normal marine, you can set up a defensive position with sandbags or metal around these machines to likely benefit your team more than you would on the front lines, as long as you keep them active. Make sure you bring some kind of eye protection if you're repairing it yourself! Staying behind barricades is obviously a lot safer, and your teammates will thank you when they need somewhere secure to hide from a flanker, or when a Marine with a minigun you paid for ends up shredding the Queen. If you like this sort of gameplay, consider actually playing as an Engineer.
Sniping
The TL-127 rifle can fire at enemies a long distance away, and with aim mode the bullets will go straight through any Marines on the way there. You won't be hitting that hard on your own, but an extra 80 damage might just stop a xenomorph from retreating behind a corner. At fights near the landing zone this is more effective, but it can work in any open area. Just make sure you aren't getting left behind, or those same flankers you keep trying to pick off will be the end of you. The laser sniper doesn't have to worry about travel time, but it can't use aim mode and does a lot less damage. Requisitions can also provide you with an autosniper with a night vision scope, which is a Boiler's worst nightmare.
Terminology
Main page: Terminology
| TGMC Roles 
| ||
| TerraGov Marines | Command | Captain, Field Commander, Staff Officer, Pilot Officer, Transport Officer, Mech Pilot |
| Vehicle Crew | Assault Crewman, Transport Crewman | |
| Engineering and Supply | Chief Ship Engineer, Requisitions Officer, Ship Technician | |
| Medical | Chief Medical Officer, Medical Doctor, Researcher | |
| Marines | Squad Leader, Squad Smartgunner, Squad Engineer, Squad Corpsman, Squad Marine | |
| Civilians | Corporate Liaison | |
| Silicon | Combat robots, Synthetic, AI | |
| Xenomorphs | Tier 0 | Larva, Minions |
| Tier 1 | Drone, Runner, Defender, Sentinel | |
| Tier 2 | Hivelord, Carrier, Hunter, Wraith, Bull, Warrior, Puppeteer, Spitter | |
| Tier 3 | Gorger, Defiler, Widow, Ravager, Warlock, Behemoth, Crusher, Praetorian, Boiler | |
| Tier 4 | Shrike, Queen, King, Hivemind | |
| Others | Zombie, Emergency Response Teams, Sons of Mars, | |
